Generator Maintenance Saga: A Day in the Engine Room
Companion video click here
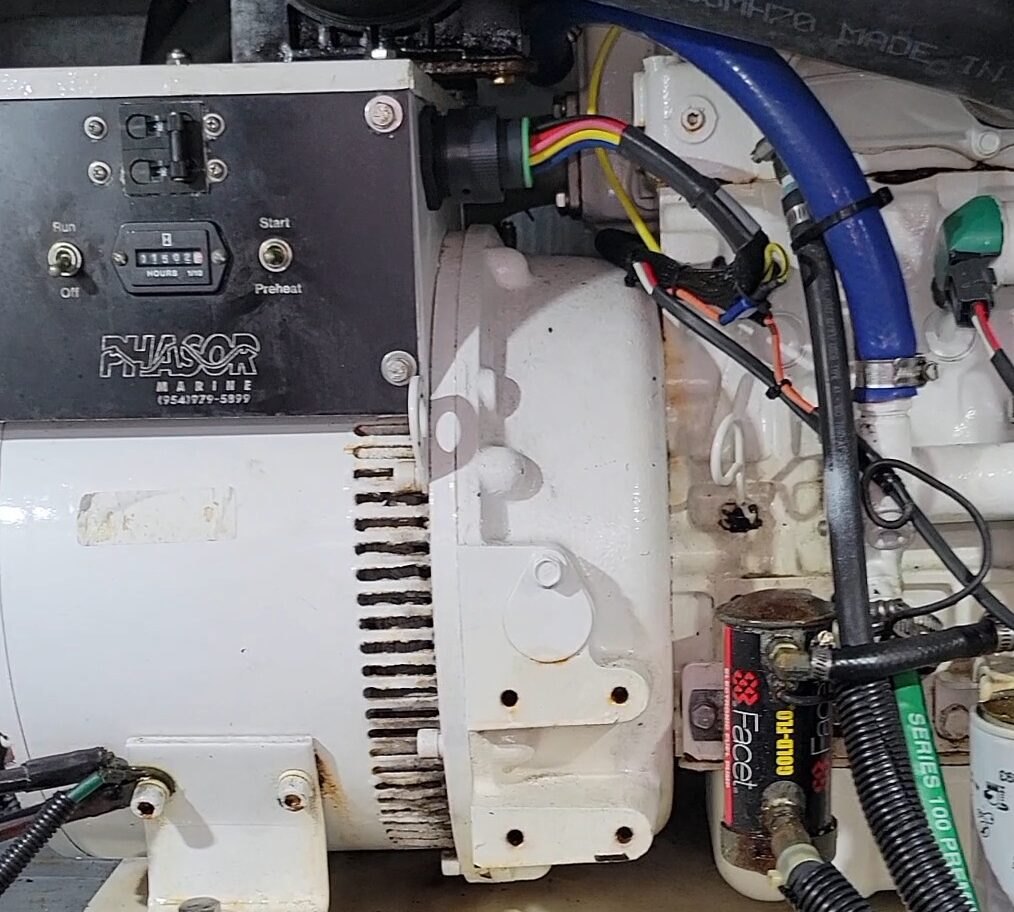
Hey there, fellow boaters! Buckle up for another adventure aboard as we dive into the nitty-gritty of generator maintenance. Today’s mission? Tackle some routine upkeep on our 10-kilowatt Phasor Marine generator, powered by a Kubota three-cylinder engine. Spoiler alert: what started as a straightforward task turned into a classic boating saga, complete with rainstorms, surprises, and a few lessons learned. Let’s jump in!
The Plan: Filters, Air Cleaner, and a Quick Check
I headed down to the engine room armed with a new air cleaner, a drop-in cartridge for the Racor fuel-water separator, and a spin-on fuel filter. Last week, I’d already knocked out an oil change (every 200 hours, using the Reverso system—super simple), so today was all about keeping the fuel and air systems in tip-top shape. Routine maintenance like this is key to keeping the generator purring, especially since this unit, with 1500 hours on it, isn’t original to the boat.
The engine room is tight, as you’d expect on a V-drive boat where the engines sit backward, and access is through a hatch in the deck. I had my bucket ready to catch any diesel drips, a pile of absorbent rags, and a can-do attitude. First up: the Racor filter.
Step 1: Tackling the Racor Fuel-Water Separator
The Racor filter is the big dog in the fuel system, separating water and gunk from the diesel before it reaches the generator. Changing the drop-in cartridge is straightforward. I loosened the T-handle, popped off the lid, and swapped out the old cartridge. The kit came with new O-rings for the T-handle and cap, which I lubricated with a dab of clean oil from the dipstick (diesel engines are pretty forgiving about a tiny bit of oil in the fuel). Pro tip: always lube those O-rings to ensure a tight seal—air in the fuel system is a diesel’s worst enemy.
The old filter had some black gunk on it, likely from algae or debris. We’d recently shocked our fuel tanks, so this wasn’t a huge surprise, but it’s a reminder to keep an eye on fuel quality. I slid the new cartridge in, refilled the housing with clean diesel using the electric lift pump (a lifesaver for priming), and buttoned it up. So far, so good.
Step 2: Spin-On Fuel Filter
Next, I moved to the spin-on fuel filter. This one’s like changing a car’s oil filter—just unscrew the old one and screw on the new. I used the electric lift pump again to fill the new filter with diesel, avoiding air pockets. A quick twist (careful not to cross-thread, especially with a pesky hose in the way), and it was done. The lift pump trick is a game-changer if your generator has one; otherwise, you’d be manually priming or dealing with air bubbles.
Step 3: Air Cleaner Swap
The air cleaner was the easiest part. It sits in a canister held by clips, and the old one was looking a bit tired. I popped in the new filter (open end first), snapped the housing back on, and called it good. Clean air is critical for diesels—clogged filters can choke the engine, leading to high exhaust temperatures and even melted valves or pistons. No thanks!
The Curveball: A Noisy Mount and Corrosion
Just when I thought I was done, I noticed a slight rattle from the generator. A quick inspection revealed a loose air cleaner mount, likely due to corrosion and a degraded nylock nut. Corrosion is the eternal enemy in a marine environment, and despite my efforts to keep it at bay, it’s always lurking. I tightened the mount bolts, lubed them to slow future rust, and checked the generator cover screws. Sure enough, they were corroded too, but the internals looked solid—no burnt connections or weirdness.
The Real Drama: No Water Flow
With everything tightened and cleaned, I fired up the generator for a test run. The fuel pump hummed, the engine roared to life, and then… no water coming out of the exhaust. Uh-oh. The generator wasn’t pumping raw water, which is a big problem—it needs seawater to cool the system. I’d changed the impeller earlier this year, and it had been finicky for a few starts but seemed fine until now.
First, I tightened the impeller cover screws using a new 90-degree screwdriver (a cheap Amazon find that’s way better than my old crescent wrench method). No dice. Next, I checked the sea strainer, suspecting it might be clogged from some dirty water we’d been in recently. Sure enough, it was packed with junk—seagrass, gunk, you name it. I cleaned it out, vacuumed up the spilled saltwater with a shop vac (keeping salt out of the bilge is a losing battle, but I try), and reinstalled the strainer.
Still no water flow. I used the freshwater rinse system to backflush the seacock, hoping to dislodge any debris. Something definitely shot out of the hull, but the generator still wouldn’t pump on its own. Frustration was setting in, and rainstorm number two wasn’t helping my mood.
The Impeller Swap and a Last-Ditch Effort
I decided to swap out the impeller, even though the one in there was new. I pulled it and installed a spare impeller with a couple hundred hours on it, lubricating it with liquid soap to avoid a dry start. Cleaned the sealing surfaces, reinstalled the cover, and cranked the generator again. No luck.
Then I noticed a tiny bit of water leaking from the seacock valve during the backflush—a potential air leak. I pulled the valve, resealed it with RectorSeal, and tried again. Still nothing. At this point, I was ready to throw in the towel, but I decided to use the freshwater rinse system to prime the generator. With positive pressure from the dock hose, it finally started pumping. I shut off the rinse, let the generator run, then turned it off and took a break to clear my head.
The Final Test
An hour later, I returned, disconnected the freshwater rinse, and cranked the generator one last time. Survey says… success! Water was flowing, and the system held its prime. I’m not entirely sure if it was an air bubble, a slightly loose impeller cover, or the resealed seacock, but something finally clicked.
Lessons Learned
- Take Breaks When Frustrated: Stepping away for a water and a think can save you from dumb decisions.
- Check the Basics: A clogged sea strainer or loose mount can cause big problems.
- Tools Matter: That 90-degree screwdriver was a small investment that made a big difference.
- Corrosion Never Sleeps: Stay vigilant with lubrication and inspections.
- Freshwater Rinse Systems Are Gold: They’re not just for rinsing—they can save the day when troubleshooting.
Wrapping Up
Generator maintenance is rarely just “swap some filters and go.” Boats have a way of turning simple tasks into adventures, but that’s part of the charm, right? Keeping the engine room clean, staying on top of corrosion, and being patient got us through. If you found this saga helpful, hit that subscribe button and ring the bell for more boating adventures. Got a maintenance tip or a story of your own? Drop it in the comments—I’d love to hear it. Until next time, fair winds and smooth seas!
Companion video click here